Showing posts with label ikea hack. Show all posts

Tuesday, August 13, 2013

IKEA PICKS FROM THE FALL CATALOG


I love Ikea but I always need a game plan before I venture out to my local Ikea and brave the winding pathways through the endless affordable furniture/home decor items. I get lost, overwhelmed, and frankly annoyed with Ikea so when I get their ginormous catalog twice a year I rip out my favs and take a trip out there.

I thought these might help you in your excursions to Ikea too! I see some great hack ideas...

 
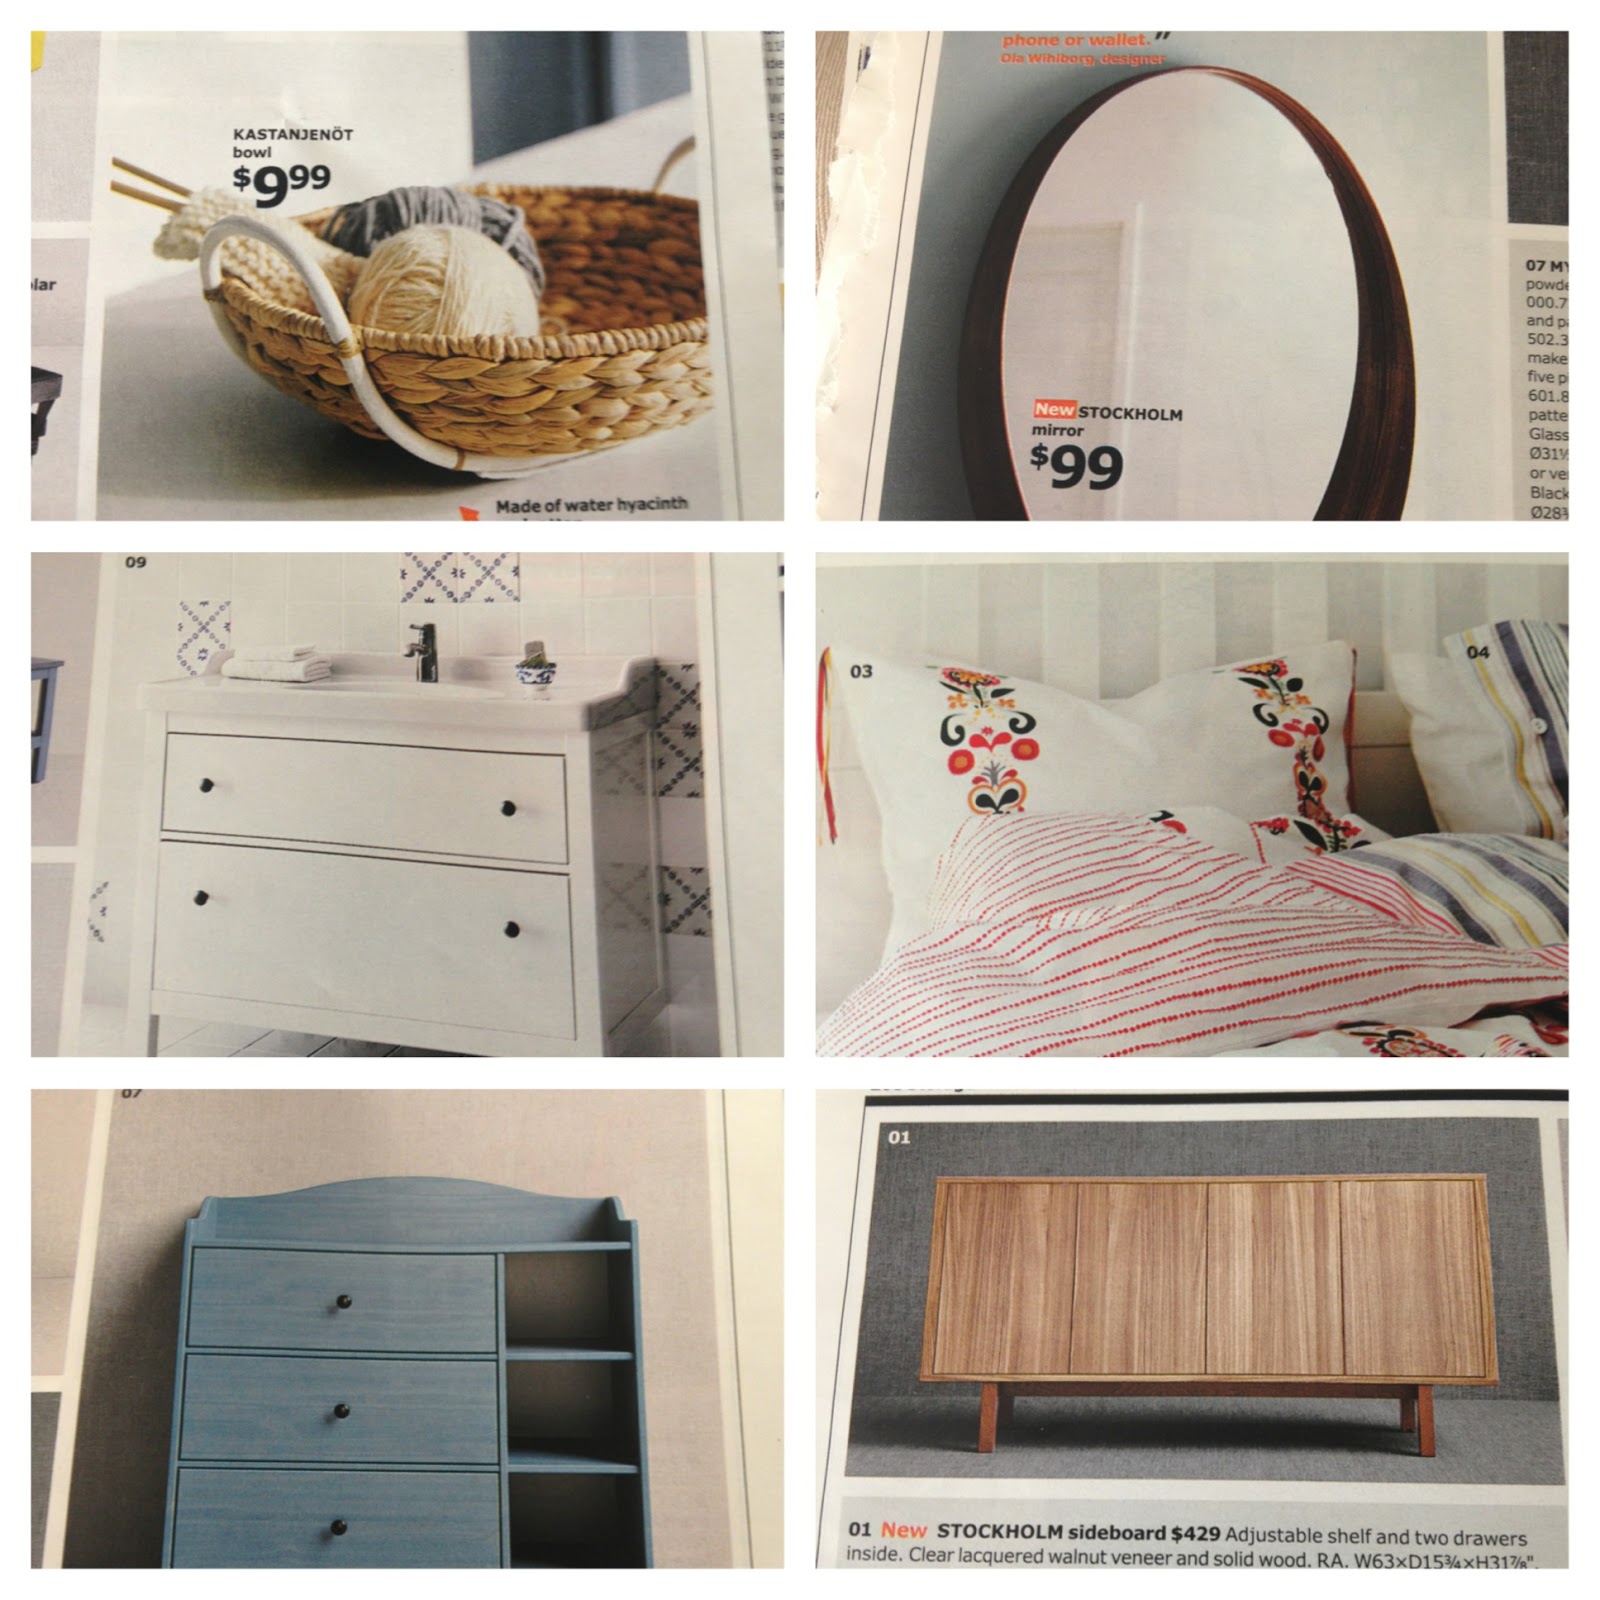
RATTAN BOWL - $9.99 

ROUND MIRROR - $99 
(would love it with the inside lip painted bright white + attach a tie of some sort to hang it)

if you are doing a small remodel this sink is PERFECT! And the price for the top and the cabinet is amazing. You can always change out the knobs for a more custom look.

so vintage and fresh! love this duvet!


This might be one of the more pricy tables they offer, but I love the legs and walnut top. Very mid-century modern chic.


 STICK-ON HANGERS - $7.99
genius solution for the bath!

when purchasing a colored sofa it's hard to commit, but for this price I would buy a green velvet sofa!

  SIDEBOARD - $429
this is super chic and paint the legs white, gold, or even black would really dress it up. Or even paint the sides white and leave the doors wood for a fresh mid-century look.

 ROLLING CART - $79.99
A no-brainer hack. Paint the legs gold, red, green, mint, (really any color) and use in the bathroom, office, as toy storage, wherever! Top tray is an organizer perfect for jewelry or makeup/toiletries.


I would love to hear what your favorites are, if I missed some great new Ikea products, or if you own any of these! Look for a hack of the rolling cart from me soon :)

Friday, May 10, 2013

IKEA HACK - MALM TABLE TO GRASSCLOTH CONSOLE


 As you know I'm not really a DIYer but I get so inspired when I go to Ikea. The low prices, clean lines, and easy to refinish furniture gets me every time!

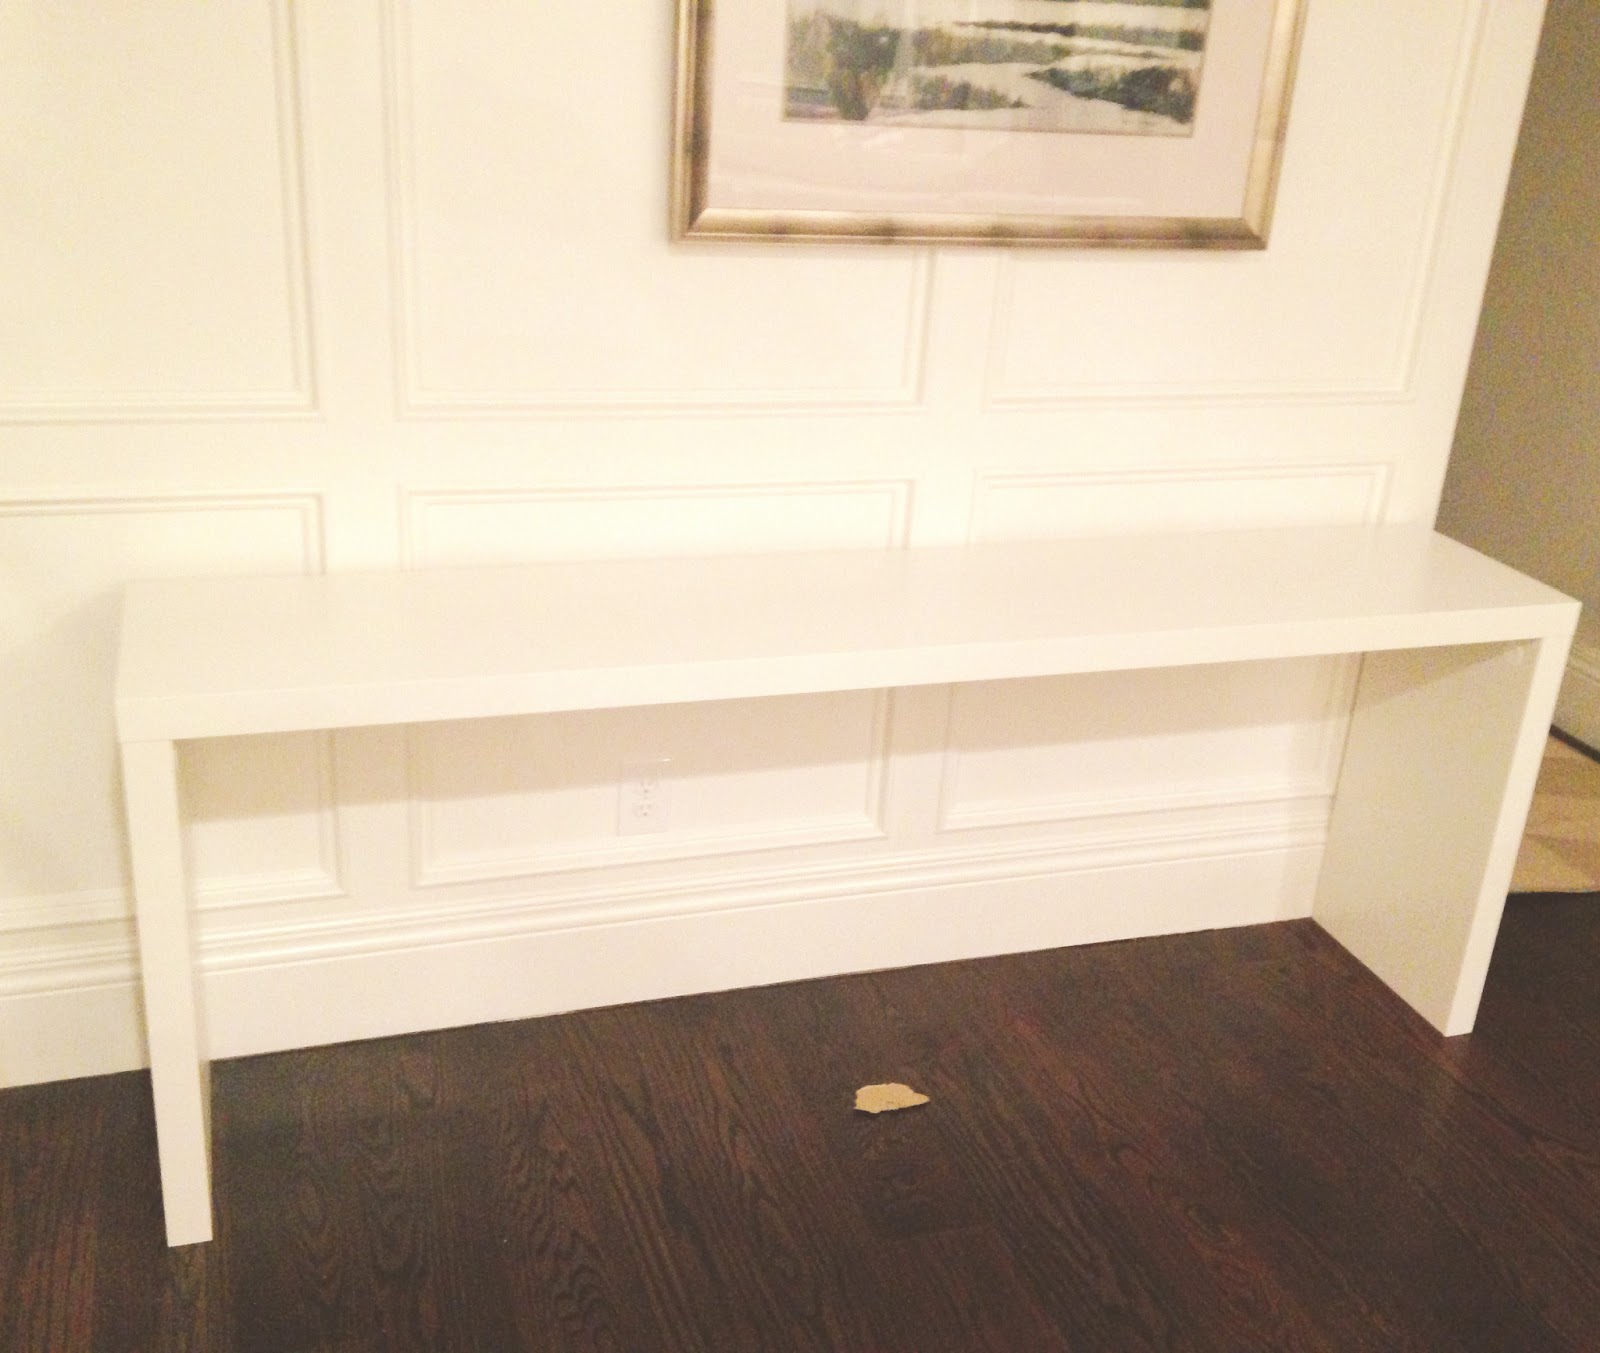
Have you seen one of their newest furniture pieces, the Malm Occassional Table? This piece has wheels on the bottom so it slides over your bed to be used for reading, breakfast in bed, whatever. But when I saw it I knew it would make the perfect console table for my entry! I had been searching for so long but didn't want to spend a lot of $$ so when I found this I was super excited.


Here is the piece in real life.
(excuse the piece of the box left behind)


I considered leaving the table as is, but this piece isn't the glossy white finish a lot of their pieces are, and I would like it a LOT better if it was the lacquer finish.  I also don't love how the sides have a big seam (see pic below) and the fact that there are plastic caps on the inside of each leg that covers the screws. Other than that, the piece itself is really solid and worth every penny of the $129. (BTW, I didn't install the wheels that come with this piece)

But this table needed something more...


And it just so happened that I had some Thibaut Grasscloth laying around from a project. So I knew just what to do - cover this bad boy with grasscloth wallpaper! Here is what I used...

 WHAT YOU WILL NEED:

1. A single roll of grasscloth wallpaper.

2. Something to cut with (I used scissors, but I think an exacto knife or something like that would be really effective and precise) Grasscloth is a little tricky because the grass strips make it more cumbersome to cut clean lines. The scissors worked great for me.

2. 1 can of Spray Adhesive + 2 rolls of Permanent Double-Sided Tape


3. Newspaper (to cut templates)

This DIY was easy, yet really time consuming (a lot of cutting and measuring). I think it took me a total of 4 hours, but some of that time included trial and error and cutting 2 pieces that didn't quite match up right. I am an impatient DIYer and I pay for that mistake :)

I recommend using the spray adhesive AND the double-sided tape because the tape helps the edges stay put and the spray adhesive ensures the middle of the wallpaper sticks to the console. I have to be honest, in some places I just used the tape and in others I just used the spray adhesive and I ended up going back a few days later and putting both on there. It really needs both.

I used newspaper to cut templates of the sheets needed to cover the legs and top. This didn't really work for the top piece since it's so long. The top piece I just cut the straightest line I could down the center of my wallpaper sheet. I had to do some trimming after I applied it, but that's the fun of DIY! 

I then for each sheet of wallpaper lined all the edges of the table (where the sheet would be going) with the double-sided tape, sprayed the adhesive on the back of the wallpaper and pressed it on the table. You need to be quick with this process to make sure the tape and the spray glue doesn't dry out before you adhere it.

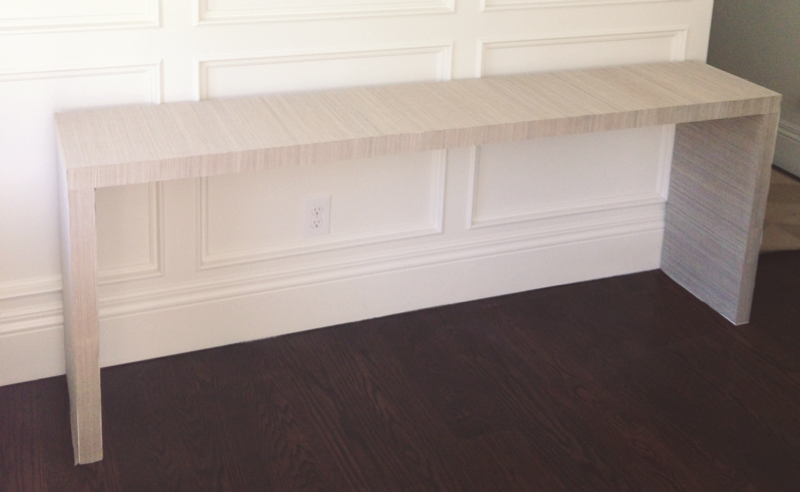
And after applying 11 sheets of wallpaper you now have a finished product!


Notice how I laid the grasscloth so the lines were running horizontally on the top and it continued down the side of the console for a clean continuous look. I did a separate strip of wallpaper for the top and the side, and the side of the leg but they look almost like one piece.


I styled the table a couple of different ways. Here I have the big Bladet glass vases from Ikea filled with white rocks from West Elm (wish they were from the beach or something meaningful :) and the sticks are bamboo sticks I bought at World Market years ago.


I had this gold tray from One Kings Lane that works perfectly as a holder of my mail. I have a mail slot in my front door so the mail drops on the floor in my entry and I just pick it up, sort it, and set it in the tray! It's a lot better than setting it on my dining room table :)


Here you can see the inside of the legs. I had the wallpaper running horizontally again, but you could do vertical and I think it would look nice as well.


This is my "I just walked in the front door and set down my hat and scarf" pic. Don't you love staging areas for a photo?! But seriously, I love that picture of my husband and our daughter and while I'm not sure how I want to style this table, I kind of like this photo there.


In this photo I put my West Elm silver branch in the center for a very "branchy" decor look.


Here I took the branches out of the vase and just set them across the table. I think I may need to slowly collect things over time that I want to put on this table. I would love to eventually put a couple of stools underneath and maybe get a rug. This post should probably end as a "to be continued...."
But for now I think I've given you enough "versions" of the same Ikea hack Malm table, so this is it until next time. BTW, in "real life" I have a basket underneath this table filled with shoes! 

I would love to hear which styling you liked best for this table. And as always, if you have an Ikea hack you would like to share - please send it on!

And have a great weekend! I will be hanging with Leo at the theater watching The Great Gatsby with the hubby and some friends (how excited are some of you about this movie!)

Thursday, December 13, 2012

IKEA HACK - AN INEXPENSIVE CHAISE

This isn't the newest Ikea hack out there, but this is definitely my new favorite. I LOVE a great chaise, but sometimes it feels like the one piece in your living room, extra room, that you don't want to spend a lot of money on, so when I saw this Ikea hack on Pinterest, (originally published in House Beautiful), I had to share. This is also the perfect idea for big city apartment dwellers on a budget.


The owner, Zach Motl, used the Ikea MALM bed frame and simply put the headboard piece at both ends to create the chaise. It's only $89 as shown below, so I'm guessing if you buy 2 headboards instead it might be a little bit more.


Then you need a mattress to create the cushion. I personally would get the Ikea memory foam mattress so it has that nice boxy look like Motl's, but it would be super comfy to sit and sleep on. You could buy one of their spring mattresses for a $100 less too, but I would make sure it wasn't a thin mattress like Ikea used in the photo above.


And then it's time to make a cover for the mattress. I would make one or have one made that wrapped around the entire mattress with a zipper in the center, or velcro that would go underneath. And of course I would love a blue velvet, like the one I used on my sofa.

 Or something a little less serious, like this cotton/linen stripe fabric...


I also think you could get away without a lot of sewing by wrapping the mattress in the fabric and securing it underneath somehow. (I have some ideas in mind using elastic material and sewing strips that secure onto buttons). Other options for covers might be an extra large blanket or even a woven rug - you can get really creative.

Then make some bolster's like he did, or I love this gold dot pillow from Caitlin Wilson that would be amazing with the blue velvet or the stripe.


All in all you would probably be into this chaise around $500. That is WAY less expensive than any chaise I could find that would be comparable in style. And look what Zach Motl's chaise turns into at night...

GENIUS! Like I said, perfect for small-space dwellers! And here is another view of his Ikea hack chaise.


I love the round bolster pillows. I am seriously considering this hack for my own home, but mine would go in my basement family room and I would do a really fun fabric on the cover, because I could in that space. And how great would this be when my kids have a sleepover and need an extra bed! The ideas keep coming :)

If you have an Ikea hack that you've done or you love, please share by commenting or sending us an email. We would love to post it!

Wednesday, December 5, 2012

IKEA HACK UPDATE - LITTLE GREEN NOTEBOOK FEATURE

We were thrilled to have our Ikea Hack featured yesterday on one of our very favorite blogs Little Green Notebook!  Jenny is always doing such amazing DIY work, we were beyond excited she liked our simple project. We took some better pictures of the desk so you can see her in all of her inexpensive glory! Click here for more details.


Tuesday, November 6, 2012

IKEA HACK OFFICE DESKS

If you've been following me at all you will know I'm not a DIYer, but you will be so proud of Jamie and I for doing our own little Ikea Hack job on the Vika Amon table for our desks at the new office. We chose this desk because of the beautiful glossy white top and the GREAT price (only $55 for the table + legs!!)

Here is what the desk and legs normally looks like (we bought the white legs).
As you know we are a little obsessed with gold, so naturally we thought "You know what would look good with that glossy white top? Gold legs!" So Jamie made a quick run to Home Depot and bought the Rust-Oleum Metallic gold spray paint.


These metal legs didn't need any prep besides making sure they were clean. We took the legs outside to the parking lot and laid down the Ikea box from the table top. Then in quick downward sprays we sprayed the legs. Try to spray as continuously and in the downward motion as much as possible to avoid dripping from spraying in one place too long.


Here is the leg finished and drying.


And after we let them dry for a couple of hours we came back to the office and assembled the desk. Here is our finished product!


Isn't that SO much better than the original desk? I LOVE this metallic paint. The legs really look like brass and the ordinary screws look like nice brass bolts. It really classed up the desk.

And you can see our new office in the background - isn't it pretty?! We are so excited to be at this new office space and even more excited at how I can better serve my clients with the huge design library and great resources.

Also notice that this photo is an Instragram photo! Yes, I finally left the dark ages and got my first iPhone! I only have one photo posted but I would love some followers - I'll be posting great photos of our projects, and great furniture finds. My Instagram name is MARIANNEBROWN12.

Hope you enjoyed my little DIY. (Now I'm going to let my bruised spraying finger rest - spray painting is hard work!)

Related Posts Plugin for WordPress, Blogger...