Showing posts with label west elm. Show all posts

Thursday, February 19, 2015

BEST OF HOUZZ 2015

I NEVER WIN ANYTHING. Raffles, giveaways, games at parties, (like the guess how many gumballs in the jar game), and definitely not awards. So when I saw a message in my inbox from "The Houzz Team" that said, "You won..." I was super excited! It could have said, "You won a free subscription" and I would have been thrilled. But this was even better - I actually won Best of Houzz 2015 in the Design category. And they gave me a badge for my website and a certificate to display!

my badge and certificate for my award!

The little kid in me is really excited about this. It just felt good to win something and get a BADGE! I mean, when was the last time someone gave you a badge? Even if it is for my website and blog. I am wearing it proudly.

And this was the room that helped me win this prestigious award...


Yes, it's my master bedroom that was so well captured by the talented Emily Brown. And it's funny, because this room is probably my least expensively decorated room. With nightstands and a rug from Ikea, bedspread and skirt from Target, and $30 art from a consignment store. The only expensive item is the headboard, which is custom and was the big splurge of the bedroom coming in at $1200. 

I do love this room today as much as I did four years ago when we moved into our new home. The best part about it is that I don't feel like I need to redecorate it because it feels really timeless to me, but not boring. (a win-win) Thanks Houzz community for sending the love my way and giving me this award!

And in honor of this award I'm going to post my newest project that I posted to Houzz, next week. It's one of my all time favorites, and I can't wait to share. Look for it on Monday and have a great weekend!

Friday, May 10, 2013

IKEA HACK - MALM TABLE TO GRASSCLOTH CONSOLE


 As you know I'm not really a DIYer but I get so inspired when I go to Ikea. The low prices, clean lines, and easy to refinish furniture gets me every time!

Have you seen one of their newest furniture pieces, the Malm Occassional Table? This piece has wheels on the bottom so it slides over your bed to be used for reading, breakfast in bed, whatever. But when I saw it I knew it would make the perfect console table for my entry! I had been searching for so long but didn't want to spend a lot of $$ so when I found this I was super excited.


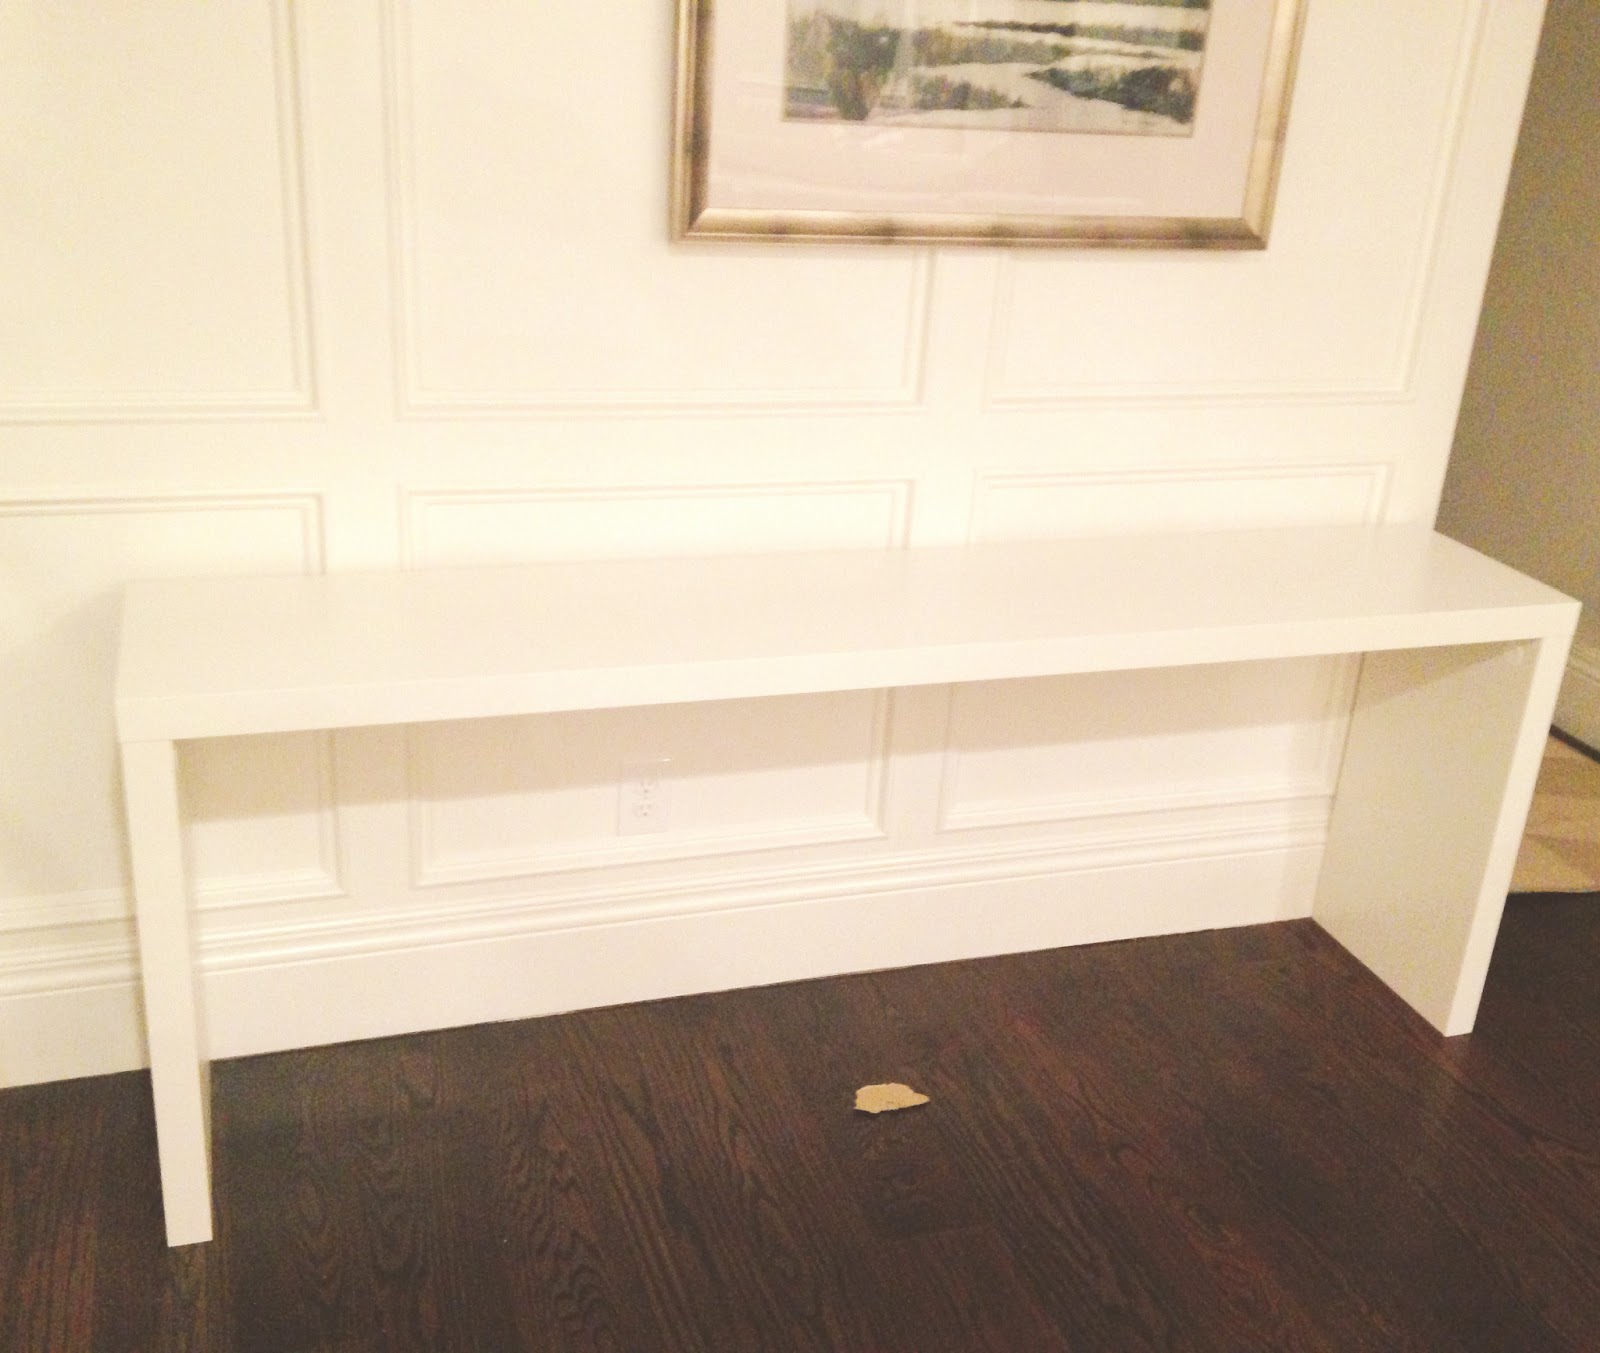
Here is the piece in real life.
(excuse the piece of the box left behind)


I considered leaving the table as is, but this piece isn't the glossy white finish a lot of their pieces are, and I would like it a LOT better if it was the lacquer finish.  I also don't love how the sides have a big seam (see pic below) and the fact that there are plastic caps on the inside of each leg that covers the screws. Other than that, the piece itself is really solid and worth every penny of the $129. (BTW, I didn't install the wheels that come with this piece)

But this table needed something more...


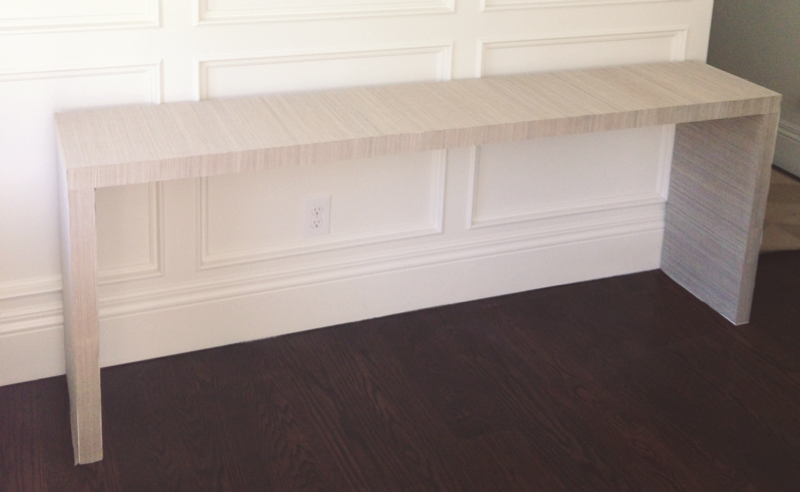
And it just so happened that I had some Thibaut Grasscloth laying around from a project. So I knew just what to do - cover this bad boy with grasscloth wallpaper! Here is what I used...

 WHAT YOU WILL NEED:

1. A single roll of grasscloth wallpaper.

2. Something to cut with (I used scissors, but I think an exacto knife or something like that would be really effective and precise) Grasscloth is a little tricky because the grass strips make it more cumbersome to cut clean lines. The scissors worked great for me.

2. 1 can of Spray Adhesive + 2 rolls of Permanent Double-Sided Tape


3. Newspaper (to cut templates)

This DIY was easy, yet really time consuming (a lot of cutting and measuring). I think it took me a total of 4 hours, but some of that time included trial and error and cutting 2 pieces that didn't quite match up right. I am an impatient DIYer and I pay for that mistake :)

I recommend using the spray adhesive AND the double-sided tape because the tape helps the edges stay put and the spray adhesive ensures the middle of the wallpaper sticks to the console. I have to be honest, in some places I just used the tape and in others I just used the spray adhesive and I ended up going back a few days later and putting both on there. It really needs both.

I used newspaper to cut templates of the sheets needed to cover the legs and top. This didn't really work for the top piece since it's so long. The top piece I just cut the straightest line I could down the center of my wallpaper sheet. I had to do some trimming after I applied it, but that's the fun of DIY! 

I then for each sheet of wallpaper lined all the edges of the table (where the sheet would be going) with the double-sided tape, sprayed the adhesive on the back of the wallpaper and pressed it on the table. You need to be quick with this process to make sure the tape and the spray glue doesn't dry out before you adhere it.

And after applying 11 sheets of wallpaper you now have a finished product!


Notice how I laid the grasscloth so the lines were running horizontally on the top and it continued down the side of the console for a clean continuous look. I did a separate strip of wallpaper for the top and the side, and the side of the leg but they look almost like one piece.


I styled the table a couple of different ways. Here I have the big Bladet glass vases from Ikea filled with white rocks from West Elm (wish they were from the beach or something meaningful :) and the sticks are bamboo sticks I bought at World Market years ago.


I had this gold tray from One Kings Lane that works perfectly as a holder of my mail. I have a mail slot in my front door so the mail drops on the floor in my entry and I just pick it up, sort it, and set it in the tray! It's a lot better than setting it on my dining room table :)


Here you can see the inside of the legs. I had the wallpaper running horizontally again, but you could do vertical and I think it would look nice as well.


This is my "I just walked in the front door and set down my hat and scarf" pic. Don't you love staging areas for a photo?! But seriously, I love that picture of my husband and our daughter and while I'm not sure how I want to style this table, I kind of like this photo there.


In this photo I put my West Elm silver branch in the center for a very "branchy" decor look.


Here I took the branches out of the vase and just set them across the table. I think I may need to slowly collect things over time that I want to put on this table. I would love to eventually put a couple of stools underneath and maybe get a rug. This post should probably end as a "to be continued...."
But for now I think I've given you enough "versions" of the same Ikea hack Malm table, so this is it until next time. BTW, in "real life" I have a basket underneath this table filled with shoes! 

I would love to hear which styling you liked best for this table. And as always, if you have an Ikea hack you would like to share - please send it on!

And have a great weekend! I will be hanging with Leo at the theater watching The Great Gatsby with the hubby and some friends (how excited are some of you about this movie!)

Thursday, March 7, 2013

MY FAV KITCHEN ISLAND LIGHTS

I have a thing for lighting. I think every designer has their favorite element/category of design they love the most or feel the most comfortable with. For me, it's lighting. I've said it before and I'll say it again - the lighting choices you make will make a bigger impact on the room than almost anything else - especially in the kitchen. And that is why I wanted to share with you some of my favorite kitchen island light fixtures!
(click on pic to enlarge)

1 / 2 / 3 / 4 / 5 / 6 / 7 / 8 / 9 / 10 / 11 / 12 / 13

Most of the lighting options above would look best in a pair or in threes, so keep that in mind. There are SO many great lighting options out there it was hard to narrow it down, but I chose these lights because I feel they are unique, bring a lot of style, and are well made. I can recommend all of these fixtures with no worries. 

Each kitchen is so different and there are so many choices that it can be overwhelming. If you are trying to decide between some lighting options contact us for a consultation (if you are local) or you can do it through our E-Design or Design Dilemma program! 

Below are rooms that have these lights in them to inspire you...


#9


#12


#7

#2


#8

Hope you enjoyed my favorite kitchen island lights! Would love to hear what your favorites are...

Friday, February 1, 2013

WHAT'S UP - 2.1.13

+ So last night's West Elm + Craft Lake City DIY Workshop was super fun. In fact a lot more fun than I was expecting. Making a dream catcher was trickier than I expected, but I really enjoyed the class and my finished product. Malinda was a great teacher and I have a new found respect for what she does.

Malinda Fisher of Desert Rose Jewelry introducing the dream catcher DIY class
beginning step
finished web
finished dream catcher necklace!
Thanks Malinda + West Elm + Craft Lake City for such a great night. Their next DIY Workshop is bookbinding and you better believe I'm signing up for that one!

+ Our dental office - Parley's Creek Dental - is getting close to being finished. My upholsterer sent me a pic of one of our finished side chairs for the waiting room.

We were on a budget so we found these chairs from Overstock. (click on pic to buy)


We weren't loving the light gray linen for this project so we decided on doing a mint buffalo check fabric from Pindler + Pindler.


And to make it so the chair didn't look too traditional for our space we decided to do a contrasting navy blue welt using our favorite $10 linen from Grayline Linen (click on pic to buy)


And this is the finished product! (Don't mind the background - upholstery shops are not beautiful spaces - sorry Brian :)

overstock chair + buffalo check + navy blue linen welt

This chair is a little more fun, don't you think?

+ Here's a little sneak peak as to what other fun fabrics are going in the dental office...

Romo Ortega collection fabric + Benjamin Moore Gray Owl paint swatch + buffalo check

Can I tell you how much in love with ROMO fabrics new collection?!! Let me show you how fantastic it is. 


I am using another ROMO fabric for my other project from their TULIPA collection that I equally am in love with.


I'm a sucker for a great floral fabric on a white background. 

+ And yes, my favorite project of all is still these little cuties...


I posted this pic of Eva on Instagram and tagged Eddie Ross (the king of beautiful table settings) and he actually commented on my photo! I'm a big fan of his so I was super excited...thanks again Eddie!

And that's what's up!! Hope you all have a fantastic weekend.

Tuesday, January 22, 2013

OFFICE UPGRADE

Do you remember the real estate brokerage office space I designed a little while back? Below is a picture of the conference room I took right after we finished getting everything in the office (don't mind the tiny funny looking plant on that big table! It didn't stay there long :)

CONFERENCE ROOM
All of the conference room furniture is from Ikea. These guys were on a budget and didn't want to spend more money on their office although I strongly urged them to do so. One of the owners already had that table and we bought the plastic chairs as extra seating. These chairs were never intended to be the chairs for the conference table! But they felt they had spent enough money and sent me on my way.

HOWEVER after spending more and more time in the conference room and hosting clients in there they saw that they needed a more professional look and asked me back to help them buy some big boy furniture :)


I am still looking for some other chairs to replace the plastic Ikea side chairs, but what a difference some nice furniture made, right?! And I love that carrara marble top with the walnut base. The leather chairs are from West Elm and are super comfy. Now if they could just keep their plants from dying we might be in business ;)

Lesson learned - spend the money the first time (if you can) and get the furniture the space deserves!

Related Posts Plugin for WordPress, Blogger...